File类
1
2
3
4
5
6
7
8
9
10
11
12
13
14
15
16
17
package demo10;import org.junit.Test;import java.io.File;public class FileTest @Test public void test1 () new File("D:\\hello.txt" );new File("D:\\java" ,"jdk" );new File(file2,"jre" );
常用方法
1
2
3
4
5
6
7
8
9
10
11
12
13
14
15
16
17
18
19
20
21
22
23
24
25
26
27
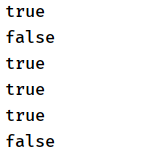
package demo10;import org.junit.Test;import java.io.File;public class FileTest @Test public void test2 () new File("D:\\hello.txt" );new File("hello.txt" );"========================" );
hello.txt
1622378943689
hello.txt
1
2
3
4
5
6
7
8
9
10
11
12
13
14
15
16
17
18
19
20
21
22
package demo10;import org.junit.Test;import java.io.File;public class FileTest @Test public void test2 () new File("D:\\Java" );for (String s : list){"========================" );for (File f : listFiles){
bin
release D:\Java\bin
1
2
3
4
5
6
7
8
9
10
11
12
13
14
15
16
17
18
19
20
package demo10;import org.junit.Test;import java.io.File;public class FileTest @Test public void test2 () new File("D:\\hello.txt" );
1
2
3
4
5
6
7
8
9
10
11
12
13
14
15
16
17
package demo10;import org.junit.Test;import java.io.File;import java.io.IOException;public class FileTest @Test public void test2 () throws IOException new File("hello.txt" );
1
2
3
4
5
6
7
8
9
10
11
12
13
14
15
16
17
18
19
package demo10;import org.junit.Test;import java.io.File;import java.io.IOException;public class FileTest @Test public void test2 () throws IOException new File("hi.txt" );if (!file.exists()){"Created!" );
1
2
3
4
5
6
7
8
9
10
11
12
13
14
15
16
17
18
19
20
21
22
package demo10;import org.junit.Test;import java.io.File;import java.io.IOException;public class FileTest @Test public void test2 () throws IOException new File("hi.txt" );if (!file.exists()){"Created!" );else {"Deleted!" );
IO流原理及分类
非文本比如视频、图像适合字节流,文本适合字符流。
IO流体系
FileReader读入数据 空参read方法 1 2 3 4 5 6 7 8 9 10 11 12 13 14 15 16 17 18 19 20 21 22 23 24 25 26 package demo10;import java.io.File;import java.io.FileReader;import java.io.IOException;public class IOTest {public static void main (String[] args) throws IOException new File("hello.txt" );new FileReader(file);int data = fr.read();char )data);while (data != -1 ){char )data);
1 2 3 4 5 6 7 8 9 10 11 12 13 14 15 16 17 18 19 20 21 22 23 24 25 26 27 28 29 30 31 package demo10;import java.io.File;import java.io.FileReader;import java.io.IOException;public class IOTest {public static void main (String[] args) throws IOException new File("hello.txt" );try {new FileReader(file);int data;while ((data = fr.read())!=-1 ){char )data);catch (IOException e) {
使用read重载方法 1 2 3 4 5 6 7 8 9 10 11 12 13 14 15 16 17 18 19 20 21 22 23 24 25 26 27 28 29 30 31 32 33 package demo10;import java.io.File;import java.io.FileReader;import java.io.IOException;public class IOTest {public static void main (String[] args) throws IOException new File("hello.txt" );try {new FileReader(file);char [] cbuf = new char [5 ];int len;while ((len = fr.read(cbuf)) != -1 ) {for (int i = 0 ; i < len; i++) {catch (IOException e) {
i<len,我们下面把它改成i<cbuf.length,可以看到cbuf在每一次读取时被一个个覆盖,而不是清空重新赋值。
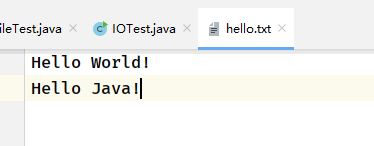
FileWriter写出 1 2 3 4 5 6 7 8 9 10 11 12 13 14 15 16 17 18 19 20 package demo10;import java.io.File;import java.io.FileWriter;import java.io.IOException;public class IOTest {public static void main (String[] args) throws IOException new File("Hello.txt" );new FileWriter(file);"Hello World!" );"Hello Java!" );
如果源文件存在,就覆盖,如果不存在,就创建然后写出。
字符流不能处理图片 不能使用字符流来处理字节数据!
处理文本 最好来说:
实现图片复制 1 2 3 4 5 6 7 8 9 10 11 12 13 14 15 16 17 18 19 20 21 22 23 24 25 26 package demo10;import java.io.File;import java.io.FileInputStream;import java.io.FileOutputStream;import java.io.IOException;public class IOTest {public static void main (String[] args) throws IOException new File("1.png" );new File("2.png" );new FileInputStream(src);new FileOutputStream(dest);new byte[5 ];int len;while ((len = fis.read(buffer))!=-1 ){0 ,len);
实现了图片复制。
指定路径下文件的复制 1 2 3 4 5 6 7 8 9 10 11 12 13 14 15 16 17 18 19 20 21 22 23 24 25 26 27 28 29 30 31 32 package demo10;import java.io.File;import java.io.FileInputStream;import java.io.FileOutputStream;import java.io.IOException;public class IOTest public static void main (String[] args) throws IOException long start = System.currentTimeMillis();"1.mp4" ,"2.mp4" );long end = System.currentTimeMillis();1000.0 );public static void copyFile (String srcPath,String destPath) throws IOException new File(srcPath);new File(destPath);new FileInputStream(src);new FileOutputStream(dest);byte [] buffer = new byte [5 ];int len;while ((len = fis.read(buffer))!=-1 ){0 ,len);
7.635
复制一个21s的mp4文件花了7.635s。
将buffer数组改为100大小
0.607
缓冲流字节型实现非文本文件复制 作用:提高流的读取和写入的速度。
1 2 3 4 5 6 7 8 9 10 11 12 13 14 15 16 17 18 19 20 21 22 23 24 25 26 27 28 29 30 31 32 33 package demo10;import java.io.*;public class BufferTest public static void main (String[] args) throws IOException new File("1.png" );new File("2.png" );new FileInputStream(src);new FileOutputStream(dest);new BufferedInputStream(fis);new BufferedOutputStream(fos);byte [] b = new byte [1024 ];int len;while ((len = bis.read(b))!=-1 ){0 ,len);
缓冲流与节点流速度对比 1 2 3 4 5 6 7 8 9 10 11 12 13 14 15 16 17 18 19 20 21 22 23 24 25 26 27 28 29 30 31 32 33 34 35 package demo10;import java.io.*;public class BufferTest public static void main (String[] args) throws IOException long start = System.currentTimeMillis();new File("1.mp4" );new File("2.mp4" );new FileInputStream(src);new FileOutputStream(dest);new BufferedInputStream(fis);new BufferedOutputStream(fos);byte [] b = new byte [1024 ];int len;while ((len = bis.read(b))!=-1 ){0 ,len);long end = System.currentTimeMillis();
24
而之前的节点流是0.607s也就是607ms,是将近30倍,这里我们用的都是1024大小的byte数组。
提高读写速度的原因:内部提供了一个缓冲区。
缓冲流对文本文件的复制 1 2 3 4 5 6 7 8 9 10 11 12 13 14 15 16 17 18 19 20 package demo10;import java.io.*;public class BufferTest public static void main (String[] args) throws IOException new BufferedReader(new FileReader(new File("hello.txt" )));new BufferedWriter(new FileWriter(new File("hi.txt" )));char [] c = new char [1024 ];int len;while ((len = br.read(c)) != -1 ){0 ,len);
上述方式仍然使用char[]数组readLine()方法。
1 2 3 4 5 6 7 8 9 10 11 12 13 14 15 16 17 18 19 package demo10;import java.io.*;public class BufferTest public static void main (String[] args) throws IOException new BufferedReader(new FileReader(new File("hello.txt" )));new BufferedWriter(new FileWriter(new File("hi.txt" )));while ((data = br.readLine()) != null ){
所以这里要加一个换行符newLine()方法
总结
处理流之二 转换流 字节输入流转换为字符输入流
1 2 3 4 5 6 7 8 9 10 11 12 13 14 15 16 17 18 19 20 21 22 23 24 25 package demo10;import java.io.*;public class TransferTest public static void main (String[] args) throws IOException new FileInputStream("hello.txt" );new InputStreamReader(fis,"UTF-8" );char [] c = new char [1024 ];int len;while ((len = isr.read(c))!=-1 ){new String(c,0 ,len));
这里我们如果用gbk去解码,肯定不对,会出现乱码。
综合使用转换流 1 2 3 4 5 6 7 8 9 10 11 12 13 14 15 16 17 18 19 20 21 22 23 24 package demo10;import java.io.*;public class TransferTest public static void main (String[] args) throws IOException new File("hello.txt" );new File("hello_gbk.txt" );new FileInputStream(f1);new FileOutputStream(f2);new InputStreamReader(fis,"UTF-8" );new OutputStreamWriter(fos,"GBK" );char [] c = new char [1024 ];int len;while ((len = isr.read(c)) != -1 ){0 ,len);
字符集
标准输入输出流
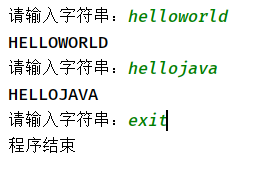
1 2 3 4 5 6 7 8 9 10 11 12 13 14 15 16 17 18 19 20 21 22 package demo10;import java.io.*;public class TransferTest public static void main (String[] args) throws IOException new InputStreamReader(System.in);new BufferedReader(isr);while (true ){"请输入字符串:" );if ("e" .equalsIgnoreCase(data)||"exit" .equalsIgnoreCase(data)){"程序结束" );break ;
System.in是字节流,所以有些情况需要转换。
打印流
数据流
对象流
1 2 3 4 5 6 7 8 9 10 11 12 13 14 15 16 17 18 19 20 21 22 23 24 25 26 27 28 29 package demo10;import java.io.FileOutputStream;import java.io.IOException;import java.io.ObjectOutputStream;public class ObjectStream public static void main (String[] args) null ;try {new ObjectOutputStream(new FileOutputStream("object.txt" ));new String("I love java" ));catch (IOException e) {finally {if (oos != null ) {try {catch (IOException e) {
1 2 3 4 5 6 7 8 9 10 11 12 13 14 15 16 17 18 19 20 21 22 23 24 25 26 27 28 29 30 31 32 33 34 35 36 package demo10;import java.io.*;public class ObjectStream public static void main (String[] args) null ;try {new ObjectInputStream(new FileInputStream("object.txt" ));catch (IOException e) {catch (ClassNotFoundException e) {finally {if (ois != null ){try {catch (IOException e) {
自定义类实现序列化和反序列化 标识接口 Serializable
1 2 3 4 5 6 7 8 9 10 11 12 13 14 15 16 17 18 19 20 21 22 23 24 25 26 27 28 29 30 31 32 33 34 35 36 37 38 39 40 41 package demo10;import java.io.Serializable;public class Person implements Serializable public static final long serialVersionUID = 475463534532L ;private String name;private int age;public Person (String name, int age) this .name = name;this .age = age;public void setName (String name) this .name = name;public void setAge (int age) this .age = age;public String getName () return name;public int getAge () return age;@Override public String toString () return "Person{" +"name='" + name + '\'' +", age=" + age +'}' ;
1 2 3 4 5 6 7 8 9 10 11 12 13 14 15 16 17 18 19 20 21 22 23 24 25 26 27 28 29 30 31 32 33 34 35 36 37 38 39 40 41 42 43 44 45 46 47 48 49 50 51 52 53 54 55 package demo10;import java.io.*;public class ObjectStream public static void main (String[] args) null ;try {new ObjectOutputStream(new FileOutputStream("object.txt" ));new String("I love java" ));new Person("Hawkeye" ,20 ));catch (IOException e) {finally {if (oos != null ) {try {catch (IOException e) {null ;try {new ObjectInputStream(new FileInputStream("object.txt" ));catch (IOException e) {catch (ClassNotFoundException e) {finally {if (ois != null ){try {catch (IOException e) {
serialVersionUID的理解 简而言之:一个对象,作为序列化的二进制流,如果没有UID,它的类改变了,就还原不回来了。
其他要求
所有属性都需要可序列化 。
transient关键字 我们都知道一个对象只要实现了Serilizable接口,这个对象就可以被序列化,java的这种序列化模式为开发者提供了很多便利,我们可以不必关系具体序列化的过程,只要这个类实现了Serilizable接口,这个类的所有属性和方法都会自动序列化 。然而在实际开发过程中,我们常常会遇到这样的问题,这个类的有些属性需要序列化,而其他属性不需要被序列化,打个比方,如果一个用户有一些敏感信息(如密码,银行卡号等),为了安全起见,不希望在网络操作(主要涉及到序列化操作,本地序列化缓存也适用)中被传输,这些信息对应的变量就可以加上transient关键字。换句话说,这个字段的生命周期仅存于调用者的内存中而不会写到磁盘里持久化。总之,java 的transient关键字为我们提供了便利,你只需要实现Serilizable接口,将不需要序列化的属性前添加关键字transient,序列化对象的时候,这个属性就不会序列化到指定的目的地中。
static修饰的属性不能被序列化 随机存取文件流
1 2 3 4 5 6 7 8 9 10 11 12 13 14 15 16 17 18 19 20 21 22 23 24 25 26 27 28 29 30 31 32 33 34 35 36 37 38 39 40 package demo10;import java.io.File;import java.io.IOException;import java.io.RandomAccessFile;public class RandomTest public static void main (String[] args) null ;null ;try {new RandomAccessFile(new File("1.png" ), "r" );new RandomAccessFile(new File("11.png" ), "rw" );byte [] buffer = new byte [1024 ];int len;while ((len = raf.read(buffer)) != -1 ) {0 , len);catch (IOException e) {finally {if (raf != null && raf2 != null ) {try {catch (IOException e) {try {catch (IOException e) {
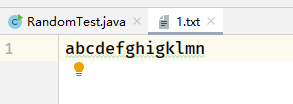
1 2 3 4 5 6 7 8 9 10 11 12 13 14 15 16 17 18 19 20 21 22 23 24 25 26 27 28 29 30 31 package demo10;import java.io.File;import java.io.IOException;import java.io.RandomAccessFile;public class RandomTest public static void main (String[] args) null ;try {new RandomAccessFile(new File("1.txt" ), "rw" );"xyz" .getBytes());catch (IOException e) {finally {if (raf != null ) {try {catch (IOException e) {
RandomAccessFile实现对数据插入 seek方法 1 2 3 4 5 6 7 8 9 10 11 12 13 14 15 16 17 18 19 20 21 22 23 24 25 26 27 28 29 30 31 32 package demo10;import java.io.File;import java.io.IOException;import java.io.RandomAccessFile;public class RandomTest public static void main (String[] args) null ;try {new RandomAccessFile(new File("1.txt" ), "rw" );3 );"xyz" .getBytes());catch (IOException e) {finally {if (raf != null ) {try {catch (IOException e) {
下面实现插入
1 2 3 4 5 6 7 8 9 10 11 12 13 14 15 16 17 18 19 20 21 22 23 24 25 26 27 28 29 30 31 32 33 34 35 36 37 38 39 40 41 42 43 44 package demo10;import java.io.File;import java.io.IOException;import java.io.RandomAccessFile;public class RandomTest public static void main (String[] args) null ;try {new RandomAccessFile(new File("1.txt" ), "rw" );3 );new StringBuilder((int ) new File("1.txt" ).length());byte [] buffer = new byte [20 ];int len;while ((len = raf.read(buffer))!=-1 ){new String(buffer,0 ,len));3 );"xyz" .getBytes());catch (IOException e) {finally {if (raf != null ) {try {catch (IOException e) {
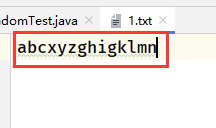
实现了从第三个插入xyz


